Most of us have had to deal with a computer virus or some sort of malware by now. It wasn’t fun; it was annoying, time consuming, and very frustrating.
When our computers start slowing down or behaving in an unusual way, we are often quick to suspect that we have a virus. It might not be a virus, but it is likely that you have some sort of malware. Some are malicious, and others are just annoying. The worst culprits are the hijackers—malware programs that take over your browser, or worse yet, your computer. I have had to remove these types of evil programs from personal computers and work computers in the past, and I’m sure you have, too. Here are 10 tips on how to prevent malware from infecting your computer, keeping your hardware safe.
This tip may go without saying, and I almost just casually mentioned it in my opening paragraph. However, I have seen many computers—especially home computers—that don’t have anti-virus/malware protection. This protection is a must-have first step in keeping you computer virus free.
2. Keep Your Anti-Virus Software Up to Date.
Having protection software is the first step; maintaining it is the second. Free anti-virus software is better than nothing, but keep in mind that it’s not the best solution. Microsoft does provide a security package for “free.” It’s free in that if you have Windows on your machine, you are granted access, but you did pay for your Windows license. Many users aren’t aware of this program, but it’s actually decent protection.
3. Run Regularly Scheduled Scans with Your Anti-Virus Software.
This too may seem like a no-brainer, but many of us forget to do this. Set up your software of choice to run at regular intervals. Once a week is preferred, but do not wait much longer between scans. It’s difficult to work on your computer while your anti-virus software is running. One solution is to run the software at night when you aren’t using your computer. However, we often turn off our computers at night, and so the scan never runs. Set your anti-virus software to run on a specific night, and always leave your computer running on that day. Make sure it doesn’t shut off automatically or go into hibernation mode.
4. Keep Your Operating System Current.
Whether you are running Windows, Mac OS X, Linux, or any other OS, keep it up to date. OS developers are always issuing security patches that fix and plug security leaks. These patches will help to keep your system secure. Similarly, keep your anti-virus software up to date. Viruses and malware are created all the time. Your scanning software is only as good as its database. It too must be as up to date as possible.
5. Secure Your Network.
Many of our computers connect to our files, printers, or the Internet via a Wi-Fi connection. Make sure it requires a password to access it and that the password is strong. Never broadcast an open Wi-Fi connection. Use WPA or WPA2 encryption. WEP is no longer strong enough as it can be bypassed in minutes by experts. It’s also a great idea to not broadcast your SSID (the name of your Wi-Fi network). You can still access it with your device, you will just have to manually type in the SSID and the password. If you frequently have guests who use your Internet, provide a guest SSID that uses a different password, just in case your friends are evil hackers.
6. Think Before You Click.
Avoid websites that provide pirated material. Do not open an email attachment from somebody or a company that you do not know. Do not click on a link in an unsolicited email. Always hover over a link (especially one with a URL shortener) before you click to see where the link is really taking you. If you have to download a file from the Internet, an email, an FTP site, a file-sharing service, etc., scan it before you run it. A good anti-virus software will do that automatically, but make sure it is being done.
This is likely the most difficult thing to do on the Internet. Many hackers will access your files not by brute force, but through social engineering. They will get enough of your information to gain access to your online accounts and will glean more of your personal data. They will continue from account to account until they have enough of your info that they can access your banking data or just steal your identity altogether. Be cautious on message boards and social media. Lock down all of your privacy settings, and avoid using your real name or identity on discussion boards.
8. Don’t Use Open Wi-Fi.
When you are at the local coffee shop, library, and especially the airport, don’t use the “free” open (non-password, non-encrypted) Wi-Fi. Think about it. If you can access it with no issues, what can a trained malicious individual do?
9. Back Up Your Files.
The best thing you can do is back up your files—all of them. Ideally you will have your files (your data) in at least three places: the place where you work on them, on a separate storage device, and off-site. Keep your files on your computer, back them up to an external hard drive, then back them up in a different location. You can use a backup service or simply get two external hard drives and keep one at work, at a friend’s house, at a family member’s house, or in a safe deposit box.
10. Use Multiple Strong Passwords.
Never use the same password, especially on your bank account. Typically, we use the same email address or username for all of our accounts. Those are easy to see and steal. If you use the same password for everything, or on many things, and it is discovered, then it takes only seconds to hack your account. Use a strong password. Use lower case, upper case, numbers, and symbols in your password. Keep it easy to remember but difficult to guess. Do not use dates or pet names.
When it comes to the cybersecurity market, much is made of the growing skills gap. Overlooked is how this can translate to enormous potential for professionals. For the second week of National Cyber Security Awareness Month (NCSAM) we break down the myriad of well-paying and rewarding jobs available, and salary data for today’s cyber workforce.
By 2020, the cyber security market is expected to grow to $170 billion. Data from Burning Glass Technologies Research from 2015 found that cyber security professionals tend to make about 9 percent more compared to other IT workers, yet there remains a lack of qualified professionals in the field. According to the 2017 Global Information Security Workforce Study (GISWS), released every two years by the Center for Cyber Safety and Education Center and ISC², the workforce gap among cybersecurity professionals is expected to reach 1.8 million by 2022.
If you want to Gain In-depth Knowledge on Cyber Security Career, please go through this link Cyber Security Training
ISC² CEO David Shearer notes, in a press release on the latest GISWS findings, that 66 percent of workers surveyed say they have too few qualified workers to effectively combat current industry threats; other research has had similar findings related to the shortage of qualified cyber security professionals. In response, more than 70 percent of employers around the world plan to increase the size of their cybersecurity staff in the coming year, the survey found; one-third of employers plan to increase their cyber security departments by 15 percent.
In 2017, there are about 780,000 professionals in the U.S. employed in the cyber security field, with about 350,000 current openings and a zero percent unemployment rate – an impressive feat for any industry today, which points to the growing demand for improved enterprise security.
The Most Popular Roles in Cyber Security Today
The ever-growing need for qualified, experienced cyber security professionals means that the field offers tremendous potential for professionals, offering job security, a good salary, and potential for advancement in the field. According to an analysis of data from the Bureau of Labor Statistics conducted by Peninsula Press, cyber security job postings are up 74 percent. We took a look at some recent data on growth in the cyber security field, the most popular cyber security roles, and salary data for today’s cyber security professionals to gain some insights into the current state of the cyber security workforce.
There are plenty of options for professionals who want to pursue a career in cyber security. Of course, any security-focused job requires strong communication skills and an in-depth knowledge of the current threat landscape, tools and technologies that today’s cyber security teams utilize to identify, mitigate, and prevent threats, and an insatiable desire to stay abreast of the latest advancements in the field. More Additional Info At Cyber Security Course
Without these characteristics, cyber security professionals risk becoming obsolete in a few short years as those with more current, advanced expertise are better equipped to meet the needs of the modern enterprise. There’s no question that the security threat landscape will continue to evolve. As a result, so will the roles enterprises require to build a strong security posture. The future looks bright with a mix of more traditional and newer roles, such as a security incident response specialists and malware analysts.
Here are a few of the requirements for some of the roles that are currently in high demand.
1. Security Architect. These are the people who must be able to put themselves in the mind of a hacker in order to prevent future attacks. They are also responsible for maintaining the security of enterprise computer systems. It is imperative for security architects to stay up to date with the latest security tools and threats.
2. Malware Analyst. All it takes is a quick scan of the daily news cycle to notice the rapid rise of ransomware attacks. This is a massive problem for businesses around the globe. The malware analyst role was designed to address the obstacles that face organizations with regard to threats such as the worldwide WannaCry ransomware attack, which resulted in around $4 billion in losses. In fact, like many cyber security roles, the need for malware analysts is higher than the available talent supply.
3. IT Security Engineer. This is also a relatively new role that is focused on quality control within IT environments, to ensure that security measures are in place to address continuing threats.
4. Security Consultant. Since there is a shortage of professionals with skills in cyber security, many companies turn to outside experts such as security consultants. The specific responsibilities carried out by a security consultant will vary, depending on the threats and current security posture of the client company; however, security consultants have no problems keeping themselves busy due to high demand.
5. Security Software Developer. There is a never-ending need for developers to create new applications to thwart hackers. The recent focus is on cloud storage, as more companies are leveraging cloud computing for mission-critical applications.
6. Security Incident Responder. Security incident responders must be curious about the motive behind an attack in order to create an efficient response. The demand for security incident responders has grown substantially along with the increase in cybercriminal activity.
7. Security Systems Administrator. The security systems administrator is the professional responsible for defending systems against unauthorized access and establishing security requirements for enterprise networks.
8. Data Security Strategist. As more enterprises strive towards AI and IoT initiatives, expect the demand for data security strategists to rise. This role focuses on optimizing data security functions and data storage. Moreover, the data security strategist must help to create the policies needed to protect stored data.
9. CISO. The CISO needs to champion tasks such as acquiring the necessary funding, resources, and awareness for critical security projects. Moreover, the CISO serves as a leader in driving the organization to make smarter security decisions while delivering positive results around cyber security objectives.
10. Cyber Security Specialist. The cyber security specialist maintains the security of a computer network through testing, updates, and protection.
Required Skills and Characteristics for Cyber Security Professionals
Some cyber security specialists started out practicing ethical hacking as teens. While some teens end up taking the malicious path, many recognized how easy it is to hack into vulnerable systems and then began to translate that knowledge into developing policies and software that can mitigate risks and better protect applications, networks, and endpoints. Other cyber security professionals got their start in the military, working in cryptologic communications or a similar function while pursuing studies in the field.
Success in cyber security, sadly, can often go unnoticed. Too often, cyber security gets attention only of the negative kind – when systems have been breached or widespread attacks impacting hundreds of businesses hit the airwaves. When networks are running seamlessly and hacks have been thwarted, no one notices. Thus, cyber security professionals should be comfortable with being the unsung hero. Few laypersons realize the amount of work and expertise it takes to maintain and enhance network and system security.
Other essential non-technical skills, characteristics, and practices that can help cyber security pros get noticed and advance in their careers include:
Ask questions. No cyber security professional is all-knowing; it’s impossible with the rapid pace at which the threat landscape changes. There is always someone who has information that you don’t, so embrace the sharing of information with your fellow professionals.
Promote your work. As stated earlier, good security work can easily go unnoticed. As a result, many employees outside of the IT department don’t understand the importance of following sound security practices. Take the lead in promoting a security mindset throughout the organization and take advantage of opportunities to educate other departments.
Communicate effectively. Cyber security is a highly technical field, but you can’t speak in technical jargon when communicating threats and security needs to employees in other departments or non-technical stakeholders. It’s important to have the ability to convey key policies and processes in a way that the layperson can easily understand.
Take risks. You must be willing to test and break stuff in a lab setting; for many security pros today, this is the fun part of the job. Hackers are always testing new routes for accessing valuable data. Through penetration and other methods, you’ll need to put your company’s systems and applications to the test to identify their breaking points.
Continue to seek knowledge. In this industry, it is critical to keep up with the always-evolving threat landscape. Enterprises seek to hire experts who keep up with new threats on a daily basis.
Education and Background Requirements
There are many cyber security programs available from certificates to doctoral degree options, with studies and degree programs encompassing subjects such as:
Computer forensics
Internet security
Cryptography
Cyber security fundamentals
Data recovery
Information systems privacy
Internet security
Often, cyber security technicians only need a security certificate or associates degree, coupled with relevant experience in the field. On the other hand, cyber security engineers must have a Bachelor’s degree or higher.
Certifications can include:
Certified Reverse Engineering Analyst (CREA)
Certified Penetration Tester (CPT)
Certified Ethical Hacker (CEH)
Certified Computer Forensics Examiner (CCFE)
CISSP
CISA
CISM
Experience levels vary substantially, with executive-level positions and senior management roles typically requiring several years or more of on-the-job experience, while entry-level positions are available for new graduates. With the growing demand for cybersecurity professionals, it’s easy for graduates to find good-paying entry-level positions with ample opportunities for advancement.
Existing Information Technology professionals interested in pursuing careers in cyber security can obtain valuable education through a number of online courses. Coursera, for instance, offers a Cybersecurity Fundamentals specialization path which includes classes on:
Usable security
Cryptography
Hardware security
Software security
Those who complete the courses, which cost $49, earn a certificate.
OnlineITguru is another popular online course platform, offering courses in cyber security such as:
Introduction to Cyber Security
CCNA Security 2015 Free Video Boot Camp: CCP And More
Cyber Security: Build a Secure, Resilient Company
For widely recognized training, courses from the SANS Institute or Carnegie Mellon University, Software Engineering Institute, CERT Division are solid options for those who wish to advance their training and further their knowledge.
Salary Data for the Top Cyber Security Roles
There is ample available data on cyber security salaries, with a broad range of findings; however, it’s clear that cyber security careers can be lucrative. According to CIO, cyber security professionals earn an average of $116,000 annually or $55.77 per hour, for instance, while PayScale estimates that the average salary for computer security specialists is around $74,000, with location as a major factor in pay structure. A January 2017 article by Steve Morgan at Forbes, based on data from multiple sources, points out that top cyber security salaries in major U.S. metros can reach as much as $380,000 annually. You Can Also See Cyber Security Online Training
According to Glassdoor.com, a cyber security engineer makes an average of $85,000 annually, while the Infosec Institute estimates that the average annual salary for an incident responder is $81,000, although the average varies by location, at about $83,000 in San Francisco and around $70,000 in Georgia. For a vulnerability research engineer, the average salary is around $96,000 annually. Salaries fluctuate based on location and company size, but the data is adjusted for cost of living. In San Francisco, for instance, the salary for a senior cyber security engineer can range between $122,000 and $207,000. In Atlanta, the salary ranges between $72,000 and $107,000.
According to a report from TechRepublic, the 15 cities in the United States with the highest salaries for cyber security professionals include (salary data adjusted for cost of living):
1. Minneapolis, MN: $127,757 2. Seattle, WA: $119,349 3. San Francisco, CA: $119,346 4. Dallas, TX: $117,890 5. Denver, CO: $117,308 6. Chicago, IL: $111,303 7. Austin, TX: $110,190 8. Salt Lake City: $106,207 9. New York, NY: $102,271 10. San Jose, CA: $99,075 11. San Diego, CA: $98,303 12. Washington, D.C.: $92,191 13. Boston, MA: $88,453 14. Los Angeles, CA: $86,072 15. Arlington, VA: $74,254
The DICE IT job board published a report on the top five IT security salaries, which include:
1. Lead software security engineer: $233,333 2. Chief security officer: $225,000 3. Global information security director: $200,000 4. Chief information security officer: $192,500 5. Director of security: $178,333
Of course, salaries also vary depending on experience and education, as well as the company; larger enterprises tend to pay more in order to attract top-tier talent. Here’s a sampling of data from Glassdoor reflecting salaries at various companies; note that this data is generated based on self-reporting from employees and are often based on only a few salary reports:
U.S. Air Force: $57,000 annually
U.S. Navy: $115,000 annually
PwC: $53,000 to $73,000 annually
Northrop Grumman: $131,000 to $143,000 annually
Los Alamos National Laboratory: $86,000 to $93,000 annually
Indeed also publishes findings from its data on the most popular cyber security careers and associated salaries. According to Indeed’s current data (at the time of this writing), average salaries for cyber security careers vary widely, from $11.46 per hour for a Security Officer to $59.42 per hour for a Security Consultant. Other popular roles and average salaries include:
IT Security Specialist: $52.54 per hour (based on 3,178 salary reports)
Information Security Analyst: $40.79 per hour (based on 2,422 salary reports)
Security Engineer: $38.93 per hour (based on 4,655 salary reports)
Security Analyst: $40.87 per hour (based on 3,032 salary reports)
Intelligence Analyst: $24.54 per hour (based on 306 salary reports)
Security Specialist: $14.83 per hour (based on 6,979 salary reports)
Network Security Engineer: $51.80 per hour (based on 2,587 salary reports)
Information Technology Specialist: $20.87 per hour (based on 1,732 salary reports)
Security Consultant: $59.42 per hour (based on 1,061 salary reports)
LinkedIn is also a valuable source of information on professional cyber security roles. According to LinkedIn’s data, salaries for cyber security professionals range from $65,000 to $130,000 per year, with a median salary of $92,000 annually. For comparison, we researched the same roles identified above for which Indeed provides salary data on LinkedIn, with data on the salary range and median salary for each role listed below:
IT Security Specialist: Range – $49,100 – $141,000; Median – $97,000
Information Security Analyst: Range – $51,000 – $110,000; Median – $76,000
Security Engineer: Range – $65,000 – $154,000; Median – $102,000
Security Analyst: Range – $51,000 – $110,000; Median – $76,000
Intelligence Analyst: Range – $35,000 – $103,000; Median – $65,000
Security Specialist: Range – $49,100 – $141,000; Median – $97,000
Network Security Engineer: Range – $65,300 – $133,000; Median – $95,500
Information Technology Specialist: Range – $35,000 – $105,000; Median – $58,000
Security Consultant: Range – $50,000 – $103,000; Median – $87,500
Starting pay is also on the rise, increasing 3.8 percent in 2017 over 2016, according to InformationWeek. At PayScale, the overall salary range for a cyber security analyst is estimated at $49,652 – $117,163; when the data is filtered for entry-level professionals, the range is only slightly lower, particularly at the lower end of the range: $45,401 – $96,643.
Indeed also provides salary data for popular entry-level cyber security careers, including:
IT Security Specialist: $113,990 per year (based on 20,317 salary reports)
Security Analyst: $88,122 per year (based on 8,226 salary reports)
Entry-Level Analyst: $54,045 per year (based on 1,998 salary reports)
Network Analyst: $68,484 per year (based on 4,374 salary reports)
Information Security Analyst: $84,269 per year (based on 9,238 salary reports)
While salaries vary throughout the industry based on a number of variables such as location, experience level, role, and company, one thing is clear: cyber security professionals are in high demand and well-compensated, and if predictions are on-target, that’s not likely to change for the foreseeable future. As the threat landscape continues to become increasingly sophisticated and complex, experienced security professionals with up-to-date knowledge of the threat landscape and sophisticated hacking techniques continue to be invaluable to the modern enterprise.
Today we are going to talk about another well-known technology in the world; Kubernetes. I am sure you have heard this many times. But do you really know what it is? If the answer is a big “no”, go ahead and read this post. Today’s post will be a bit long one, but you will see yourself transform from “Zero” to “Hero” throughout it. Lets See more additional info on Spring Boot Training 💪
Step-by-Step Guide with Spring Boot, Docker & GKE
Let me tell today’s outline first:
Containers
Container Orchestrator and its role
What is Kubernetes
Why Kubernetes
Architecture of Kubernetes
Essential Components of Kubernetes
Hands-on
Containers
A container is, in simple terms, means a virtual machine without its own Operating system. We can create these containers in far-away data centers and get our work done. Importance in it is, it ensures the maximum resource usage for our work, rather than wasting resources for the Operating system, etc.
If you want to Gain In-depth Knowledge on Kubernetes/Spring Boot, please go through this link Spring Boot Course
In the usual production environment, there are hundreds and thousands of containers dedicated to various microservices. Therefore managing them is not a simple task. They need updates, version control, health checks, scaling and many more functionalities to be performed on them. This is where the need for a “Container Orchestrator” arises. If you want to learn more about containers, you can also check these best courses to learn Docker and Kubernetes for developers.
Container Orchestrator and its role
Think of a football match. If the coach does not tell players what are their places, they will stand wherever they want. If that is the case, will that team win the match? I guess not.
So what coach does is, he tell the players where they need to stand and what they need to do.
Similarly, Kubernetes, or any other container orchestrator, tells the containers to where they should stay and how they should behave. In a nutshell, the container orchestrator is like the coach and the players are like the containers or the micro-services.
What is Kubernetes
Kubernetes was born in Google as one of their In-house technology for managing containers. It is written in Go-language.
In 2015, Kubernetes was first released to the public. Later on, Google handed it over to CNCF (Linux Foundation) to manage.
So currently Kubernetes is an open-source project under Apache 2.0 license. Sometimes in the industry, Kubernetes is also known as “K8s”. Widely used term to phrase Kubernetes is “Container Orchestrator”.
Why Kubernetes over other orchestrators
Very platform-agnostic: i.e. Kubernetes can be used with bare-metal, virtual machines, cloud, Open stack, etc.
Not only for container-based orchestration. You can also use it with normal clustering.
Not tied with any other specific company or platform like Docker. Many companies support Kubernetes based clustering, including Google, Amazon Web Services, etc.
Let target deployment
Architecture of Kubernetes
Kubernetes Architecture in one image
As you can see, Kubernetes also follows a Master-Slaves architecture (also known as Master-minions) let’s talk about each of these components one by one in a very high-level manner.
Master
Master is the controlling element of the cluster. Some people call it the “Brain” of the cluster. It is the only endpoint that is open to the users of the cluster. For the purpose of fault-tolerance, one cluster may have multiple masters.
Master has 4 parts:
API server:
This is the front end that communicates with the user. It is a REST-based API that is designed to consume JSON inputs. As a default, it runs in port 443.
2. Scheduler:
Scheduler watches API server for new Pod requests. It communicates with Nodes to create new pods and to assign work to nodes while allocating resources or imposing constraints.
3. Cluster store:
Cluster store is a persistent storage holding cluster states and configuration details. It uses ETCD (open-source distributed key-value store) to store these data.
4. Controller:
Includes Node controller, Endpoint Controller, Namespace Controller, etc.
Nodes (Slaves/Minions)
Nodes are the workers. They are the ones that do all the “Work” assigned to the cluster. Inside a Node, there are 3main components, apart from the “Pods” (I will talk about Pods later on). Those 3 parts are;
Kubelet
Kublets do a lot of work inside a Node. They register the nodes with the cluster, watch for work assignments from the scheduler, instantiate new Pods, report back to the master, etc.
2. Container Engine
Container Engine is the responsible person for managing containers. It does all the image pulling, container stopping, starting, etc. Most widely used container engine is Docker. However, you can also use Rocket for this.
3. Kube Proxy
Kube Proxy is responsible for assigning IP addresses per pod. Each time a pod creates, a new IP address will be allocated for that pod. Kube Proxy also does the Loadbalancing work.
Apart from those mentioned components, Nodes have their own default pods like logging, health checking, DNS, etc. Each node expose 3 read-only endpoints through (usually) localhost:10255. Those endpoints are,
/specs
/healthz
/pods
Essential Components of Kubernetes
There are few main components of a Kubernetes Cluster architecture that anyone should know before going into working with Kubernetes. First one is a Pod:
Pods
A pod is the atomic unit of deployment or scheduling in Kubernetes.
The Pod is a Ring-faced environment with its own Network stack and Kernal namespaces. It has containers inside. No pod can exist without a container. But there can be single-container pods or multi-container pods depending on the application we deploy.
For example, if you have a tightly coupled application with an API and a log, you can use one container for API and another for the log. But you can deploy both of them in the same Pod. However, industry best practice is to go with single-container architecture.
Another small thing to note about Pod is that they are “Mortal”. Confused? Let me explain. A pod’s life-cycle has 3 stages:
This is similar to Born → Living → Dead. There will be no Resurrection; no re-birth. If a Pod died without completing his task, a new Pod will be created to replace the dead Pod. The most important thing is, this new pod’s IP and all other factors will be different from the dead pod.
Deployment Controller
To manage the Pods, there are numerous controllers presented in Kubernetes. Such controller used for the purpose of deployment and declarative updates is known as Deployment Controller.
In the Deployment object (mostly used format is a YAML file. But in this tutorial, I use command line) we can describe our “Desired state” like what is the image needed to be deployed, what are the ports to expose, how many replicas to have, what are the labels needed to be added, etc. What Deployment Controller does is to check this desired state periodically and make changes in the cluster to make sure the desired state is achieved.
Service
Another one component I am going to use in this tutorial is “Service”. Before telling what is a Service, I will describe why we need a service.
As I mentioned earlier, Pods are mortal. When a pod dies, a new one is born to take its place. It doesn’t have the same IP address as the dead one.
So think of a scenario where we have a system with both front end service and backend service. From the front end to call the backend, we need an IP or URL. Let’s assume we used the pod IP of the backend service inside the frontend code. We face three issues:
We need to first deploy our backend and take its IP. Then we need to include it in the front end code before making the docker image. This order must be followed.
What if we want to scale our backend? We need to update the frontend again with the new pod IPs.
If the backend pod died, a new pod will be created. Then we need to change the front end code with the new pod IP and make the docker image again. We also have to swap the image in the frontend. This will become even more problematic if backend has several pods.
Too much work and complicated work. This is why we need a “Service”.
How Kubernetes Service works
Service has its own IP address and DNS which are stable. So the frontend is successfully decoupled from the backend services. Therefore, a Service is a High-level stable abstract point for multiple pods.
For the discovery of Pods, a service uses something called “labels”. Pods belong to a Service via labels. In the service initializing stage, we describe what labels the service should look for via “selector” flag. If the Service found a Pod with all the labels mentioned in the selector section, the Service will append its endpoint list and add the pod to the list. (Having extra labels than the mentioned, is acceptable. But should not miss any label mentioned.)
When a request comes to the Service, it uses a method like Round-Robbin, Random, etc. to select the request forwarding pod.
Use of Service object facilitates us with many advantages, like request forwarding to only healthy pods, load balancing, roll-back of versions, etc. But the most important advantage of a Service is successful decoupling of System components.
There are 5 types of Services available in Kuberntes which we can choose according to our purpose: (Source: Kubernetes.io, 2019)
ClusterIP: Exposes the service on a cluster-internal IP. Choosing this value makes the service only reachable from within the cluster. This is the default ServiceType.
NodePort: Exposes the service on each Node’s IP at a static port (the NodePort). A ClusterIP service, to which the NodePort service will route, is automatically created. You’ll be able to contact the NodePort service, from outside the cluster, by requesting <NodeIP>:<NodePort>.
LoadBalancer: Exposes the service externally using a cloud provider’s load balancer. NodePort and ClusterIP services, to which the external load balancer will route, are automatically created.
ExternalName: Maps the service to the contents of the externalName field (e.g. foo.bar.example.com), by returning a CNAME record with its value. No proxying of any kind is set up. This requires version 1.7 or higher of kube-dns
Hands-On with Springboot and Google Kubernetes Engine
Our small system can convert US State Codes to State names and vice versa. I need to make this tutorial to talk about communication between Pods. Therefore I will make the system have two APIs instead of one, even though we can do it with just one service.
All right! We are going to make 2 APIs; “User API” and “Datareader API”.
Micro Service Architecture of Tutorial’s Project
The User API which is given access by users have two end-points.
The Datareader API which is accessed by the UserAPI also has two end-points.
[GET] request → /readDataForCode
[GET] request → /readDataForState
Let’s start with developing this locally using Spring boot.
1. Developing the Spring Boot API
I will be using IntelliJ Idea Ultimate to create my Spring Boot project.
In IntelliJ, Go to “New Project” and select Spring Initializer from the side-pane. Leave the service URL to default and select your JDK version and click next. In the next window also remember to select appropriate Java version. The rest you can change according to your preference and click next again.
In the next window, select web from side-pane and check the boxes in front of the Web and the Rest Repository dependencies. Click next again. Select the project location in the final window and click finish.
First, we will make the Datareader API with the project we just created. In the main class, write the following code.
Code for Datareader API (Find the code in my GitHub repo)
Since I wish to run the User API in Spring boot default port (8080), I will change this one’s port to 9090 using “application.properties” file in the resource folder. In application.properties, write server.port=9090.
Then Execute Maven Goal (In the Maven Sidebar)→ clean install.
Now run the project and check end-points using software like Postman or using browser. If you are successful, you will receive two different JSON from calling two end-points.
Let’s call the DataReader API using User API when a user triggers an endpoint of User API. Here is the code for it:
Code for User API (Find the code in my GitHub repo)
Run both services simultaneously and check whether all endpoints are working.
If all are working properly, you are good to go to the next step.
2. Converting Spring Boot API to Docker image
I will first dockerize my Datareader API.
Go to your project’s root directory (in my case it’s “codestatebkend”) and open it in the terminal. Next, create a Dockerfile file using touch Dockerfile. Open that Dockerfile using a text editor or nano and enter the following:
# Start with a base image containing Java runtime (mine java 8)
FROM openjdk:8u212-jdk-slim# Add Maintainer Info
LABEL maintainer="yoursfriendly@gmail.com"# Add a volume pointing to /tmp
VOLUME /tmp# Make port 8080 available to the world outside this container
EXPOSE 8080# The application's jar file (when packaged)
ARG JAR_FILE=target/codestatebkend-0.0.1-SNAPSHOT.jar# Add the application's jar to the container
ADD ${JAR_FILE} codestatebkend.jar# Run the jar file
ENTRYPOINT ["java","-Djava.security.egd=file:/dev/./urandom","-jar","/codestatebkend.jar"]
As we have completed our Dockerfile, now we can move on to making the Docker Image. To avoid installing anything in my local machine and for the sake of ease, I am going to use Google shell from Dockerizing to Kubernetes deployment.
The easiest way to get your project into Google shell is through a Git repository. After you commit the code in the Git Repo, Go to Google cloud account and click the shell button in the right-side top corner. Then clone the Git repo inside the project shell using git clone.
Go to the cloned projects root directory and type, ./mvnw clean package to make the jar file. Now all ready. First, set PROJECT-ID variable using:
If you see your image in the list, you are successful!
Now let’s run this docker image to check whether everything is working fine.
docker run --rm -p 8080:8080 gcr.io/${PROJECT_ID}/codestatebkend:latest
Click on “Web preview” button in the right-top corner of the Shell window. You will see the message “Hello I’m DataReader”
Similarly, make the Docker image for the User API. Before that don’t forget to change the target URL in the code (variable named serverUrl in my code) from localhost to down below:
http://dataservice.default.svc.cluster.local
With the URL used as above, it is a must to name our ClusterIP Service as “dataservice”.
3. Deploying the Docker image in Google Image Repository
To check whether everything is working properly, call to an Endpoint of User API, using postman or browser
Success! Our System working as expected
Voila! You have a system with two tiers, fully running on a Kubernetes Cluster in Google Cloud!
6. Autoscaling capabilities
Something extra for you 😋
The above system I made with one running pod each for each API. But in a practical scenario, you need more than one Pod to manage the load. So Let me tell you how you can scale your application:
kubectl scale deployment userapi --replicas=2
Let’s check whether we succeed, with kubectl get pods.
Hope you enjoyed coding with me. Leave a comment down below on how this tutorial is. If you faced any issue, leave a comment, I’ll help. Criticisms are also welcome 😉
Today every business activity needs a proper network for its smooth transactions. Not even transactions, but some other things need to be taken care such as “data”. So, every business needs to protect the data and the transactions which can be done by applying proper Network Security.
need of network security?
Network security is an action taken by any business to prevent any malicious use or any damage to the network’s internal data and its users. It aims to keep the network safe and running it without any issues. Blocking the harmful usage of network or network data is the primary thing here. At this time we need Cyber Security Training, It helps businesses to reduce the risk of being victims of any data theft. It ensures the safety of the data along with protecting the systems from harmful viruses. Huge traffic may cause network stability problems. Later this may lead to any critical issue. By securing network business can enhance its wings to the world without any issues.
Types of network security
There are different types of network security. These are considered as network security tools. The following can be discussed as important types of network security.
If you want to Gain In-depth Knowledge on Cyber Security, please go through this link Cyber Security Course
Application Security: The security system that protects our applications, known as Application security. It is one of the main types of network security. It is important to have proper application security because apps may not be created perfectly. They may have some loopholes that make a hacker enter into the app. Many business operations run on different applications. These applications need tight security to protect from vulnerabilities.
Access Control: For every user of a network or device, security is important. In the business operations, it requires to put access control over the systems along with the users. Only those people should be given access that has proper authorization to the sensitive network area. Otherwise, data manipulations may occur by un- authorize means.
Antivirus software: Malware or viruses are the common things of a cyber attack. Intruders try to infuse any malware or bugs into the network area which breaches the firewall and helps to manipulate sensitive data. These things make the network system weak. Sometimes it may continue for a longer period also. Thus, the best antivirus software should be applied to protect from these vulnerabilities. It scans the typical files with more attention. It helps to find out any issues within it.
Email security: While implementing network security tools, it becomes important to protect email. There are many ways like phishing, malicious links, malware links, etc. can be attached to the emails. These come with some promising and attractive messages. This attracts the user to click on it which may cause any damage. Thus, the users of systems within an organization must undergo a security awareness program where they can come to know about different types of emails and their problems w.r.t security. The email security software filters the incoming threats as well as the messages sent to share certain information.
Firewalls: Firewalls are common elements of network security. These works as a gateway between a network and the internet. It filters the incoming and outgoing traffic by comparing the data against predefined rules and regulations. It protects the network from active threats.
Network distribution: Sorting and distributing networks according to the classification makes it easier for the security personnel to implement various policies. Network distribution also makes it simple to assign or deny any authorization.
Advantages of network security
Network security has different advantages. It aims to take preventive measures to protect the network from vulnerabilities. The key advantages of network security are as follows:
It helps to protect critical information of the client’s network.
Helps in protecting data available in all the systems of a single network within the organization.
Manages vulnerabilities like any phishing attack, malware or virus attack through the open network into the system’s network.
Creating firewalls to protect the network and the system information from any intrusions.
Importance of network security in organization
A good network security system will help an organization to secure critical and sensitive information from any issue. It will help to protect not only the organization’s network system but also sensitive information within the network. The importance of network security in an organization is very big. Here we can discuss a few important things.
Protecting the Company’s Assets: The initial goal of network security is to protect the assets of the organization. Here assets refer to the information and the network system of the company. These are as valuable as the company’s physical assets. To protect them from outside intrusions, the security personnel need to set up a strong firewall system.
Competitive advantage: An effective security system gives the organization a competitive advantage in the market. The importance of network security is very much to the financial services and e-commerce companies. All online transactions need proper network security; otherwise, the customers may not get the benefit of these transactions.
Thus, the above article focuses on the need for network security and its importance to the business world. Without proper network security, no business can survive. The security of critical information depends upon the network’s firewall system. By learning the techniques of network security systems from Cyber Security Online Training, one can build a professional career in this field. It helps to enhance skills in this area of study.
Hospital management system project in Java And Spring MVC, project report, and step by step development tutorial. Hospital Management project is the major project using hibernate and spring framework.
If you want to Gain In-depth Knowledge on Java Spring, please go through this link Spring Boot Online Training
Its using java as core technology and Mysql as backend to manage the data records. The application is following the MVC architecture with a maven tool.
Hospital Management System Project in hibernate and Spring
Overview
Hospital Management project is a web application which is helping to manage the activity of a hospital Like Patient management, Doctor management, Manage appointments. Manage the records of patients.
Objective
The main objective to develop the Hospital management system in java is to manage the hospital activity online. There will be Three main Actors or Users of the application 1) doctor 2) Admin 3) Receptionist. This project is only for college students who want to complete their Semester projects.
Hospital Management System Project in Spring MVC
Description:
There are three main actors in the system who going to manage or run the complete application. Let’s discuss one by one according to the role and readabilities.
Admin: Admin is the main actor who will be responsible to manage Doctors and Receptionists. Below is the task list which will be performed by admin.
Admin can ADD/DELETE/UPDATE a doctor.
Admin can VIEW the list of doctors.
Admin can ADD/DELETE/UPDATE a receptionist.
Admin can VIEW the list of receptionists.
Admin can ADD/DELETE/UPDATE a patient.
Admin can ADD/DELETE/UPDATE an appointment.
To filter the records at every page you will get the search box on every page or with every table.
Doctor:
The doctor can check the appointment and the patient list.
The doctor can VIEW the appointments.
The doctor can VIEW the patient list.
Receptionist:
Receptionists can ADD/EDIT/VIEW appointments.
Receptionists can ADD/EDIT/VIEW patients.
Using Java
The main objective to develop Hospital management system in java is to manage the hospital activity online. There will be Three main Actors or Users of the application 1) doctor 2) Admin 3) Receptionist. This project is only for college students who want to complete their Semester projects.
Hospital Management System Project description:
There are three main actors of the system who going to manage or run the complete application. Let’s discuss one by one according to the role and readabilities.
Admin: Admin is the main actor who will be responsible for managing Doctors and Receptionists. Below is the task list which will be performed by admin.
Admin can ADD/DELETE/UPDATE a doctor.
Admin can VIEW the list of doctors.
Admin can ADD/DELETE/UPDATE a receptionist.
Admin can VIEW the list of receptionists.
Admin can ADD/DELETE/UPDATE a patient.
Admin can ADD/DELETE/UPDATE a appointments.
To filter the records at every page you will get the search box at every page or with the every table.
Doctor:
Doctor can check the appointment and the patient list.
IBM InfoSphere DataStage is a data integration, extract, transform, and load (ETL) tool that enables users to move and transform data between operational, transactional, and analytical target systems.
Data transformation and movement is the process by which source data is selected, converted, and mapped to the format required by target systems. The process manipulates data to bring it into compliance with business, domain, and integrity rules, and with other data in the target environment.
If you want to Gain In-depth Knowledge on DataStage, please go through this link DataStage Training
This reference deployment provides AWS CloudFormation templates to deploy InfoSphere DataStage on a new OpenShift cluster. This cluster includes:
A Red Hat OpenShift Container Platform cluster created in a new or existing virtual private cloud (VPC) on Red Hat Enterprise Linux (RHEL) 7.7 instances, using the OpenShift on AWS Quick Start. See the OpenShift on AWS deployment guide for details about the underlying OpenShift deployment architecture.
A GlusterFS distributed file system that uses encrypted Amazon Elastic Block Storage (Amazon EBS) volumes.
A Microsoft Windows–based DataStage Client machine.
Architecture
Deploying this Quick Start for a new virtual private cloud (VPC) with default parameters builds the following InfoSphere DataStage environment in the AWS Cloud.
architecture for IBM InfoSphere DataStage on AWS
The Quick Start sets up the following:
A highly available architecture that spans three Availability Zones.
A VPC configured with public and private subnets according to AWS best practices, to provide you with your own virtual network on AWS.
In the public subnets, managed network address translation (NAT) gateways to allow outbound internet access for resources in the private subnets.
In a public subnet, a Linux Ansible config server Amazon Elastic Compute Cloud (Amazon EC2) instance that also serves as a bastion host to allow inbound Secure Shell (SSH) access to EC2 instances in private subnets.
In a public subnet, an EC2 instance (Windows Server 2012 R2) running the InfoSphere DataStage thick client. Inbound SSH to EC2 instances in the public and private subnets are also possible from this instance using PuTTY.
In the private subnets: – Three OpenShift Container Platform master instances in an Auto Scaling group. – Three OpenShift Container Platform etcd instances in an Auto Scaling group. – Three OpenShift Container Platform GlusterFS instances in an Auto Scaling group that use encrypted Amazon Elastic Block Storage (Amazon EBS) volumes. – Two OpenShift worker nodes in an Auto Scaling group that, combined, contain InfoSphere DataStage engine, services, and metadata repository tiers.
A Classic Load Balancer spanning the public subnets for accessing DataStage from a web browser and from DataStage Client instances. Internet traffic to this load balancer is only permitted from ContainerAccessCIDR.
A Classic Load Balancer spanning the public subnets for accessing the OpenShift Container Platform master instances. Internet traffic to this load balancer is only permitted from RemoteAccessCIDR.
A Network Load Balancer spanning the private subnets, for routing internal OpenShift API traffic to the OpenShift Container Platform master nodes.
An Amazon Route 53 private hosted zone for resolving internal Domain Name System (DNS) queries.
Single-AZ mode
This Quick Start can be deployed as a non-highly-available cluster that spans a single Availability Zone. This option is enabled by setting Non-HA for the ClusterAvailability parameter when launching the Quick Start.
Non-HA Quick Start architecture for IBM InfoSphere DataStage on AWS
Planning the deployment
Specialized knowledge
This Quick Start assumes basic familiarity with the use of the InfoSphere DataStage application, including a browser-based Designer (thin client), a Windows-based Designer (thick client), and a basic awareness of the components of a DataStage installation. If you’re new to InfoSphere DataStage, see the Additional resources section.
Take your career to new heights of success by enrolling Live free demo on AWS Online Training
AWS account
If you don’t already have an AWS account, create one at https://aws.amazon.com by following the on-screen instructions. Part of the sign-up process involves receiving a phone call and entering a PIN using the phone keypad.
Technical requirements
You must provide your IBM Customer Number (ICN) and the part numbers of the software licenses purchased, as noted in your Proof of Entitlement (PoE) certificate.
Red Hat Enterprise Linux (RHEL) 7.7 is used for the OpenShift EC2 instances in this deployment. Other distributions aren’t currently supported. The DataStage Windows Client instance is deployed from a private Amazon Machine Image (AMI) based on Windows Server 2012 R2, and the bastion host instance runs Amazon Linux. Your AWS account is given launch permission for the private AMI when the Quick Start is deployed.
Before you launch the Quick Start, your account must be configured as specified in the following table. Otherwise, deployment might fail.
Click on Generate Project button to download the maven project (demo.zip file).
Import Project into Eclipse or IntelliJ
Unzip the zip file.
Import into Eclipse as “Existing Maven Project”
Choose the root directory of the project generated (where the pom.xml file is located) and click on Finish.
Eclipse (Import Project)
IntelliJ(Open Project)
Project Structure Generated
Model Creation
Now let´s create our model classes called User and Role(Entity classes). Lombok is a very useful library used to generate boilerplate code manly for model/data objects.
User
This class includes validations based on the validations provided by Hibernate.
package com.gpch.login.model;

import lombok.AllArgsConstructor;
import lombok.Builder;
import lombok.Data;
import lombok.NoArgsConstructor;
import org.hibernate.validator.constraints.Length;

import javax.persistence.*;
import javax.validation.constraints.Email;
import javax.validation.constraints.NotEmpty;
import java.util.Set;

@Data
@Builder
@AllArgsConstructor
@NoArgsConstructor
@Entity
@Table(name = "users")
public class User {

    @Id
    @GeneratedValue(strategy = GenerationType.AUTO)
    @Column(name = "user_id")
    private int id;
    @Column(name = "user_name")
    @Length(min = 5, message = "*Your user name must have at least 5 characters")
    @NotEmpty(message = "*Please provide a user name")
    private String userName;
    @Column(name = "email")
    @Email(message = "*Please provide a valid Email")
    @NotEmpty(message = "*Please provide an email")
    private String email;
    @Column(name = "password")
    @Length(min = 5, message = "*Your password must have at least 5 characters")
    @NotEmpty(message = "*Please provide your password")
    private String password;
    @Column(name = "name")
    @NotEmpty(message = "*Please provide your name")
    private String name;
    @Column(name = "last_name")
    @NotEmpty(message = "*Please provide your last name")
    private String lastName;
    @Column(name = "active")
    private Boolean active;
    @ManyToMany(cascade = CascadeType.MERGE)
    @JoinTable(name = "user_role", joinColumns = @JoinColumn(name = "user_id"), inverseJoinColumns = @JoinColumn(name = "role_id"))
    private Set<Role> roles;

}
# ==============================================================
# = Data Source
# ==============================================================
spring.datasource.url = jdbc:mysql://localhost:3306/login?useSSL=true
spring.datasource.username = root
spring.datasource.password = adminadmin

# ==============================================================
# = Keep the connection alive if idle for a long time (needed in production)
# ==============================================================
spring.datasource.testWhileIdle = true
spring.datasource.validationQuery = SELECT 1

# ==============================================================
# = Show or not log for each sql query
# ==============================================================
spring.jpa.show-sql = true

# ==============================================================
# = Hibernate ddl auto (create, create-drop, update)
# ==============================================================
spring.jpa.hibernate.ddl-auto = update

# ==============================================================
# = The SQL dialect makes Hibernate generate better SQL for the chosen database
# ==============================================================
spring.jpa.properties.hibernate.dialect = org.hibernate.dialect.MySQL5Dialect

# ==============================================================
# = Initialize the database using data.sql script
# ==============================================================
spring.datasource.initialization-mode=always

#logging.level.org.springframework.security=DEBUG Lets see What Is Spring Boot
SQL Scripts
data.sql
REPLACE INTO `roles` VALUES (1,'ADMIN');
This script will be executed every time the application is launched if you need more roles please include them in this file.
Note: By default Spring Boot will create the database structure if you have provided in the right way your MySQL credentials in the application.properties file.
As you can see the password has been stored with a Hash algorithm due we have implemented the BCryptPasswordEncoder in our AuthenticationManagerBuilder.
The topic of cyber security is sweeping the world by storm with some of the largest and most advanced companies in the world falling victim to cyber-attacks in just the last 5 years. Against that backdrop, highly personal and sensitive information such as social security numbers were recently stolen in the Equifax hack, affecting over 145 million people. Unfortunately, as long as computers exist, we are at risk of having our digital data compromised and manipulated. However, living in the digital age is not all that scary – especially if you know what you’re doing.
Understanding how your device works is not as hard as it sounds. If you could nail long division in the 4th grade, then you can learn cyber basics that will get you pretty far in your own personal security as well as your company’s.
Cybint would like to make this learning curve easier for you by providing a list of the 20 most important cyber security terminology that you should know:
1. Cloud
A technology that allows us to access our files and/or services through the internet from anywhere in the world. Technically speaking, it’s a collection of computers with large storage capabilities that remotely serve requests.
2. Software
A set of programs that tell a computer to perform a task. These instructions are compiled into a package that users can install and use. For example, Microsoft Office is an application software.
3. Domain
A group of computers, printers and devices that are interconnected and governed as a whole. For example, your computer is usually part of a domain at your workplace.
4. Virtual Private Network (VPN)
A tool that allows the user to remain anonymous while using the internet by masking the location and encrypting traffic.
5. IP Address
An internet version of a home address for your computer, which is identified when it communicates over a network; For example, connecting to the internet (a network of networks).
6. Exploit
A malicious application or script that can be used to take advantage of a computer’s vulnerability.
7. Breach
The moment a hacker successfully exploits a vulnerability in a computer or device, and gains access to its files and network.
8. Firewall
A defensive technology designed to keep the bad guys out. Firewalls can be hardware or software-based.
9. Malware “the bad guy”
An umbrella term that describes all forms of malicious software designed to wreak havoc on a computer. Common forms include: viruses, trojans, worms and ransomware.
10. Virus
A type of malware aimed to corrupt, erase or modify information on a computer before spreading to others. However, in more recent years, viruses like Stuxnet have caused physical damage.
A form of malware that deliberately prevents you from accessing files on your computer – holding your data hostage. It will typically encrypt files and request that a ransom be paid in order to have them decrypted or recovered. For example, WannaCry Ransomware. For more information on Ransomware.
12. Trojan horse
A piece of malware that often allows a hacker to gain remote access to a computer through a “back door”.
13. Worm
A piece of malware that can replicate itself in order to spread the infection to other connected computers.
14. Bot/Botnet
A type of software application or script that performs tasks on command, allowing an attacker to take complete control remotely of an affected computer. A collection of these infected computers is known as a “botnet” and is controlled by the hacker or “bot-herder”.
15. DDoS
An acronym that stands for distributed denial of service – a form of cyber attack. This attack aims to make a service such as a website unusable by “flooding” it with malicious traffic or data from multiple sources (often botnets).
16. Phishing or Spear Phishing
A technique used by hackers to obtain sensitive information. For example, using hand-crafted email messages designed to trick people into divulging personal or confidential data such as passwords and bank account information.
17. Encryption
The process of encoding data to prevent theft by ensuring the data can only be accessed with a key.
18. BYOD (Bring Your Own Device)
Refers to a company security policy that allows for employees’ personal devices to be used in business. A BYOD policy sets limitations and restrictions on whether or not a personal phone or laptop can be connected over the corporate network.
19. Pen-testing
Short for “penetration testing,” this practice is a means of evaluating security using hacker tools and techniques with the aim of discovering vulnerabilities and evaluating security flaws.
20. Clickjacking
A hacking attack that tricks victims into clicking on an unintended link or button, usually disguised as a harmless element.
We’ve only covered the tip of the iceberg as far as cyber security terms, but this will get you started. Take the steps now to ensure that you and your business are protected – knowledge is power
Information Security means keeping the information or data secure from external threats or unauthorized access. Information security is the part of cybersecurity. The data can be highly sensitive and confidential. It is implemented to secure sensitive information from any unauthorized modification, destruction or misuse.
Information security is needed to reduce the risk level of the business. It enhances the way of doing business in a secure environment.
To learn and implement the techniques of information security, one needs to go through the Cyber Security Online Training to become an expert. Learning this technology may help the person or organization in many ways.
Need of Information Security
The word “Information” is very sensitive in nature. So its protection becomes crucial. For the business world, every piece of information is an asset. Protecting and preventing it from external threats or misuse is necessary.
It implements different strategies to protect the confidentiality of information. As the threats are increasing, the need for information security also enhances. To tighten the security of information from leakage or misuse, it becomes necessary to implement a strong firewall. Also See Ethical Hacking Certifications
Types of Information Security
There are different types of information security. Few of them are discussed hereunder;-
Application Security: It is the most adaptable method of securing critical information on computer systems. It uses different software and hardware tools to protect the application at its initial development stage. Applications can be accessed over the internet through various processes at the beginning stage. To get selected in Interview, See Cyber Security Interview Questions
The different types of Application security are as follows:-
Authentication
Firewall
Antivirus programs
Encryptions
Input validation and so on.
Infrastructure Security: Infrastructure security refers to the protection of heavy infrastructure such as rail transports, highways, hospitals, airports, electricity grid, power plants, dams, ports, etc. To protect these infrastructures, proper due diligence is needed to perform to understand the threats and vulnerabilities.
Network Security: It is concerned with the security of internal networks from malicious means that intrudes in an unauthorized way. Network security ensures the network’s safety from the abnormal threats in real-time. Network administrators continuously implement different policies to prevent unauthorized access to the network. The network security includes the features of application security also.
Cloud Security: Cloud security refers to the monitoring and protection of data on cloud sources. It is a software-based tool that constantly implements new security changes to give better user experience to the enterprises. There are some believers who think cloud computing is less secured than traditional security methods. But it has been proved that Cloud Security is less cost-effective than the regular approaches.
Managing Vulnerability: Vulnerability management refers to the scanning of networks to find the risks inherited within. As the business units are growing, they are constantly infusing users, applications and infrastructure to their entity. It requires filtering in every area of the network to find a potential vulnerability. It can save the entity from any unknown threats.
The basic principles of information security are as follows. :-
Confidentiality: Information security relates to the protection of Data. Data is the most confidential thing to protect under information security. It is required to identify the potential threats coming into. For example, we need to find who is trying to steal the data by access and block the authorization. By applying passwords, authentication, etc. the confidentiality of the information can be protected.
Integrity: Integrity means to maintain the data in its actual state and preventing its privacy from malicious things. Maintaining confidentiality is the primary thing in this regard. Moreover, frequent data backups ensure the integrity of the information.
Availability: Ensuring that access to data can be given to the authorized people only, who have the permissions. Data availability refers to the exact match of systems and the network sources that redirects the volume of data needed. A proper backup policy should be implemented to recover the data.
Thus, ensuring the confidentiality of information is the basic need for information security. The data or information can be protected from unauthorized access or disruptions by implementing different techniques. Such as; Antivirus programs, Firewalls, Copyrights, Patents, Trademarks, Privacy Policy, etc. These are considered as the information security procedures. It gives them confidence in the organization to run business in a smooth way.
The above article focuses on the insights of the Information Security and its different methods to protect the values of the information.
In order to quickly develop microservices, Spring Boot is a common choice. Why should I be interested in Spring Boot? In this blog post I’ll give you some reasons why looking at Spring Boot is interesting and give some samples on how to get started quickly. I’ll shortly talk about microservices, move on to Spring Boot and end with Application Container Cloud Service which is an ideal platform to run and manage your Spring Boot applications on. This blog touches many subjects but they fit together nicely.
If you want to Gain In-depth Knowledge on Spring Boot, please go through this link Spring Boot Online Training
Before we go deeper into why Spring Boot for microservices, we of course first need to know what microservices are. An easy question to ask but a little complex to answer in a few lines in this blog. One of the first people describing characteristics of microservices and actually calling them that was Martin Fowler. What better source to go back to then the articles he has written.
‘In short, the microservice architectural style is an approach to developing a single application as a suite of small services, each running in its own process and communicating with lightweight mechanisms, often an HTTP resource API. These services are built around business capabilities and independently deployable by fully automated deployment machinery. There is a bare minimum of centralized management of these services, which may be written in different programming languages and use different data storage technologies.’
Of course there are a lot of terms involved in this definition
It is an architectural style for developing a single application.
A suite of small services each running in its own process.
Communicating with lightweight mechanisms, often HTTP.
Build around business capabilities.
A bare minimum of centralized management of these services. This implies no application server which provides centralized management of the applications running on it.
May be written in different programming languages or use different storage technologies.
A microservice architectural style also has several characteristics. It is very interesting to look at such an architecture in more detail like for example the OMESA initiative to help you get started. As is of course obvious and true with all architectural styles, you will gain most benefits when doing it right. It is however often not trivial to determine ‘right’.
Spring Boot microservices
Spring Boot features and microservice principles
Spring Boot is based on certain principles which align with microservice architecture. The primary goals of Spring Boot:
Provide a radically faster and widely accessible getting started experience for all Spring development.
Be opinionated out of the box, but get out of the way quickly as requirements start to diverge from the defaults.
Provide a range of non-functional features that are common to large classes of projects (e.g. embedded servers, security, metrics, health checks, externalized configuration).
Absolutely no code generation and no requirement for XML configuration.
The features provided by Spring Boot also make it a good fit to implement microservices in.
Spring Boot applications can contain an embedded Tomcat server. This is a completely standalone Tomcat container which has its configuration as being part of the application.
Spring Boot is very well suited to create light weight JSON/REST services.
Features like health checks are provided. Spring Boot offers Actuator. A set of REST services which allow monitoring and management. Also externalized configuration can be used. Few centralized management features are required.
Since different storage techniques can be used, Spring provides Spring Data JPA. JPA is Java Persistence API. This API provides ORM capabilities to make working with relational databases easier (mostly vendor independent, supports EclipseLink, Hibernate and several others).
Example of an Actuator call to request health status
Easy to implement API design patterns
There are plenty of descriptions online to provide API design guidelines. See for example. An example API URL can be something like: Notice the structure of the URL which amongst other things contains a version number. Oracle Mobile Cloud Service documentation also has several design recommendations. These design considerations are of course easily implemented in Spring Boot.
See for example the below code sample:
A simple Spring Boot controller
You can see how the HTTP operations are used and the way method calls are mapped to URLs. Added benefit of this sample is that it also shows how to access the body of the request message.
Integration with backend systems
Spring Boot integrates with JPA. JPA provides an API to easily do ORM. It allows you to work with objects in Java which are backed by database data. For basic CRUD operations, the effort required to implement JPA in Spring Boot is minimal.
You only need three things to do simple CRUD operations when using the embedded Derby database.
An annotated entity. You only require two annotations inside your POJO. @Entity to annotate the class and @Id to indicate the variable holding primary key.
A repository interface extending CrudRepository (from org.springframework.data.repository)
Inside your service, you can use the @Autowired annotation to create a local variable with an instance of the repository.
Connection details for the embedded Derby server are not required. They are for external databases though. If you want to connect to an Oracle database.
Pretty comparable to microservices on Node
Node or Spring Boot? This is of course a topic which has many opinions. Many blogs have been written to compare the 2.
In several aspects, Spring Boot beats Node.js.
Performance. Read the following article. Spring Boot microservices can achieve higher throughput than similar services on Node.js.
Maturity. Spring has a long history of running Enterprise Applications. Node.js can also be used but is less mature.
Security. Spring and Spring Boot are clearly better than Node.js. For example, Kerberos support in Node is limited while Spring Boot provides easy abstractions for several security implementations amongst which Kerberos tokens.
RDBMS. This is more easy to use in Spring Boot because of JPA.
Node.js beats Spring Boot also in several aspects
Build/package management. People who have experience with Maven and NPM often prefer NPM
UI. JavaScript is of course the language of choice for front-end applications. The Java based frameworks such as the JSF variants by far do not have the productivity as for example a framework like AngularJS.
Document databases like MongoDB. When you can work with JSON, JavaScript code running on Node.js makes it very easy to interact with the database.
Spring Boot, being in the Java ecosystem can also be combined with for example Ratpack. Ratpack provides a high throughput, non-blocking web layer. The syntax is similar to how you would code Node.js code. This is of course not so much of an argument for Spring Boot since modules on Node.js provides similar functionality. Both solutions are more alike than you would think on first glance.
It depends probably mainly on the skills you have available and your application landscape if you would choose Node.js or Spring Boot. If you’re from the JavaScript world, you might prefer to write your microservices on Node.js. If you’re from the Java world, you will prefer Spring Boot. It is important to understand there is not an obvious superior choice whether to go for Node.js or Spring Boot.
Getting started with Spring Boot
The easiest way to get started is first watch some online courses. For example this one from Java Brains. I’ll provide some nice to knows below.
Spring Tool Suite (STS)
As for an IDE, every Java IDE will do, however, since Spring Boot is build on top of Spring, you could consider using Spring Tool Suite (STS). This is a distribution of Eclipse with many specific Spring features which make development of Spring applications easier. Read more at Spring Boot Training
Spring Initializr
An alternative way to get your start project is to go to indicate your dependencies and click the Generate project button. This will generate a Maven or Gradle project for you with the required dependencies already added.
With STS, you can also use the Spring Initializr functionality easily.
Spring Boot CLI
Spring Boot CLI offers features to create and run Groovy Spring Boot applications. Groovy requires less code than Java to do similar things. It is a script language which runs on the JVM and from Groovy you can access regular Java classes/libraries.
Save this as a Groovy script (e.g. app.groovy) and run it with Spring Boot CLI like: spring run app.groovy
Getting actually started
To get started with Spring Boot, you have to add some entries to your pom.xml file and you’re ready to go. Easiest is to use the New Spring Starter project from STS since it will generate a pom, a main and test class for you. That is what I used for my sample project.
A simple pom.xml to get started with Spring Boot
Spring and Oracle
Spring is a very common Java framework. You can find traces of it in several Oracle products and features. Below some examples. If you look in other Oracle products, especially those who are Java based, I expect you will find many more examples.
SOA Suite
For example in Oracle SOA Suite.
SOA Suite itself under the covers uses Spring
SOA Suite can use Spring components
Massive Open Online Course
Oracle uses Spring Boot in courses it provides. For example in the Develop RESTful Java Microservices deployable on Oracle Cloud MOOC.
Application Container Cloud Service (ACCS)
ACCS has been around for a while. Together with Spring Boot, they provide an ideal combination to get your microservices developed and running quickly.
Application Container Cloud Service provides the features of The Twelf-Factor App out of the cloudy box so you don’t have to develop these yourself. These of course also align with the microservice principles like executing apps as stateless processes.
If you want to use ACCS with Spring Boot, there are two ways you can deploy your Spring Boot application.
You can create a WAR file by specifying war in the packaging tag in the pom.xml file. Next you can deploy this WAR file as a Java EE Web Application. This runs WebLogic in the background.
You can create a JAR file by specifying jar in the packaging tag in the pom.xml file. Next you can run this JAR file directly since you’ll get an embedded Tomcat with it and can run it as a Java SE application. The configuration will be part of the application here.


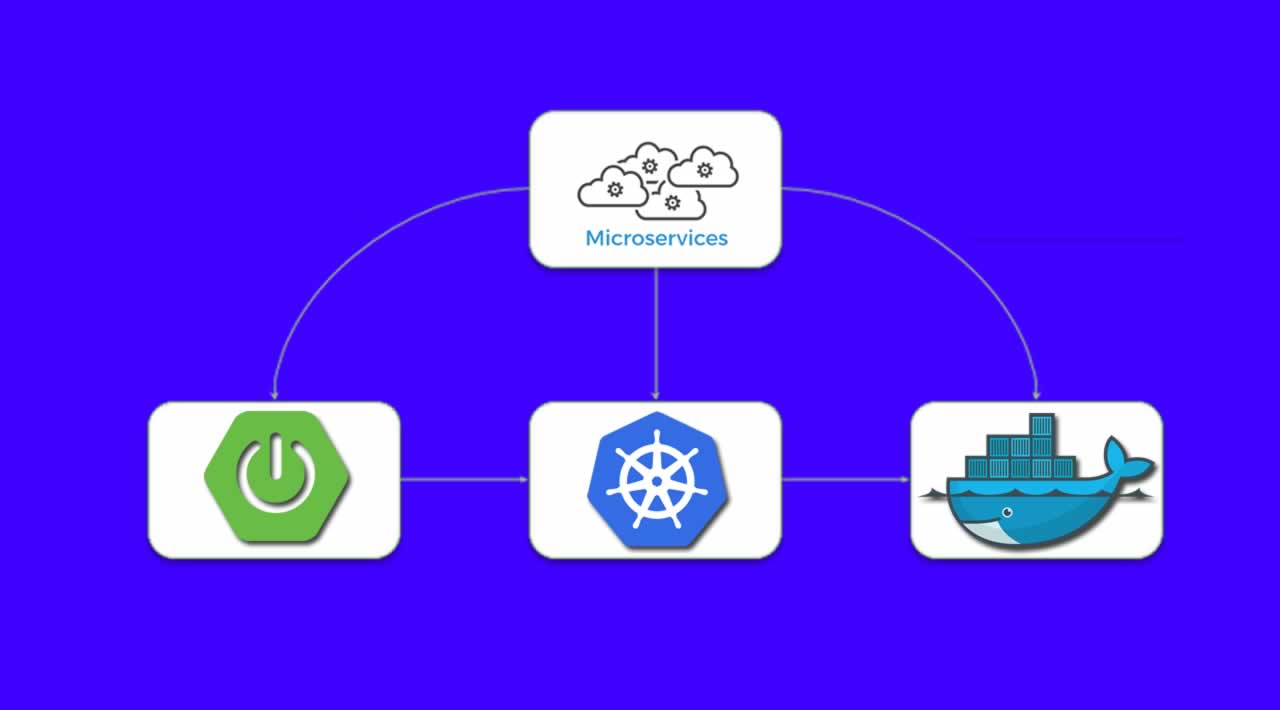


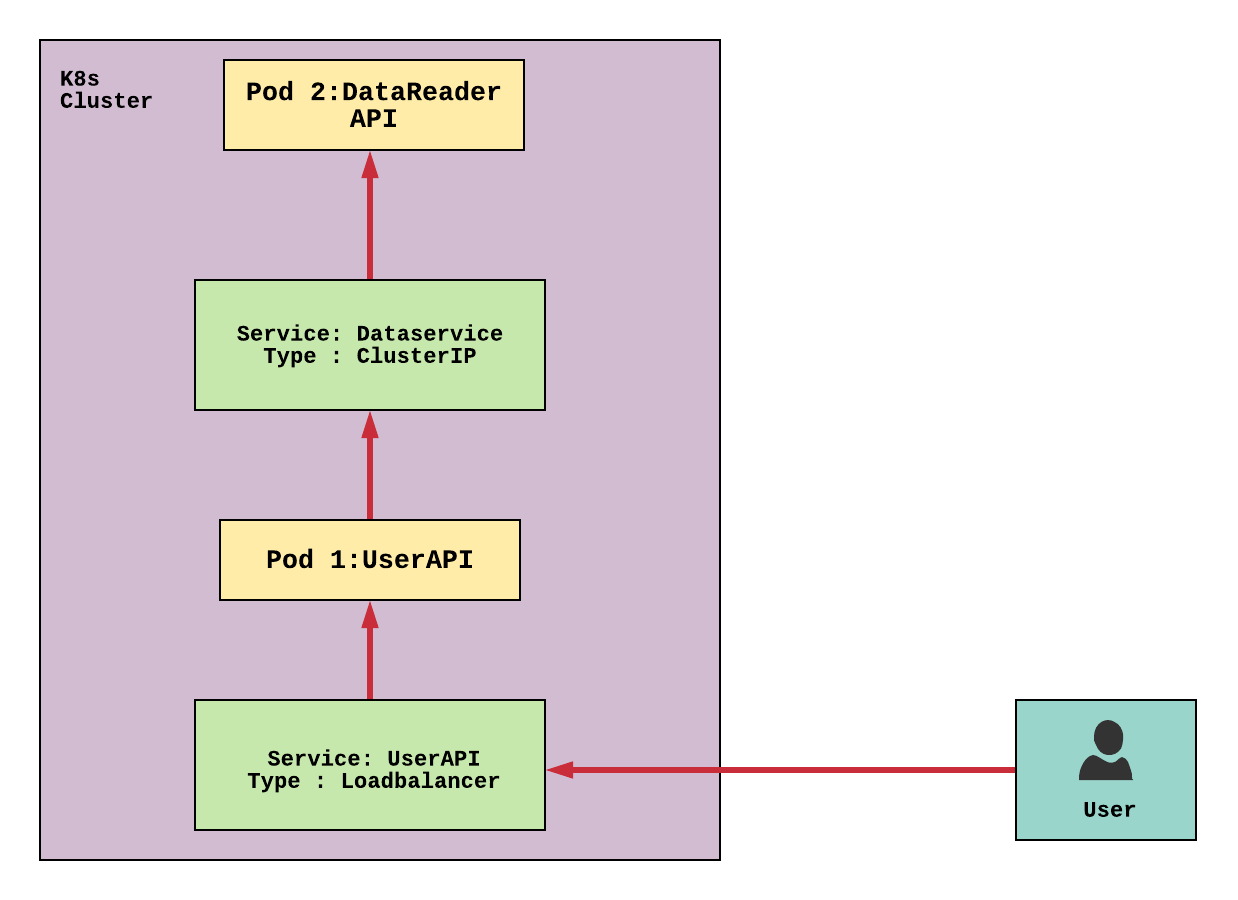


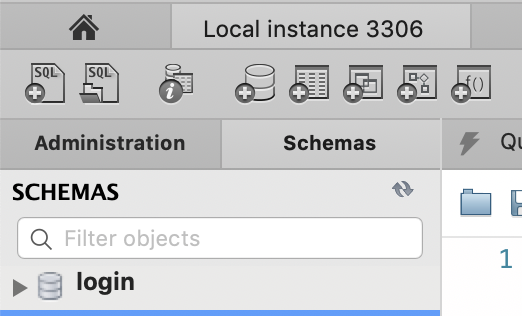
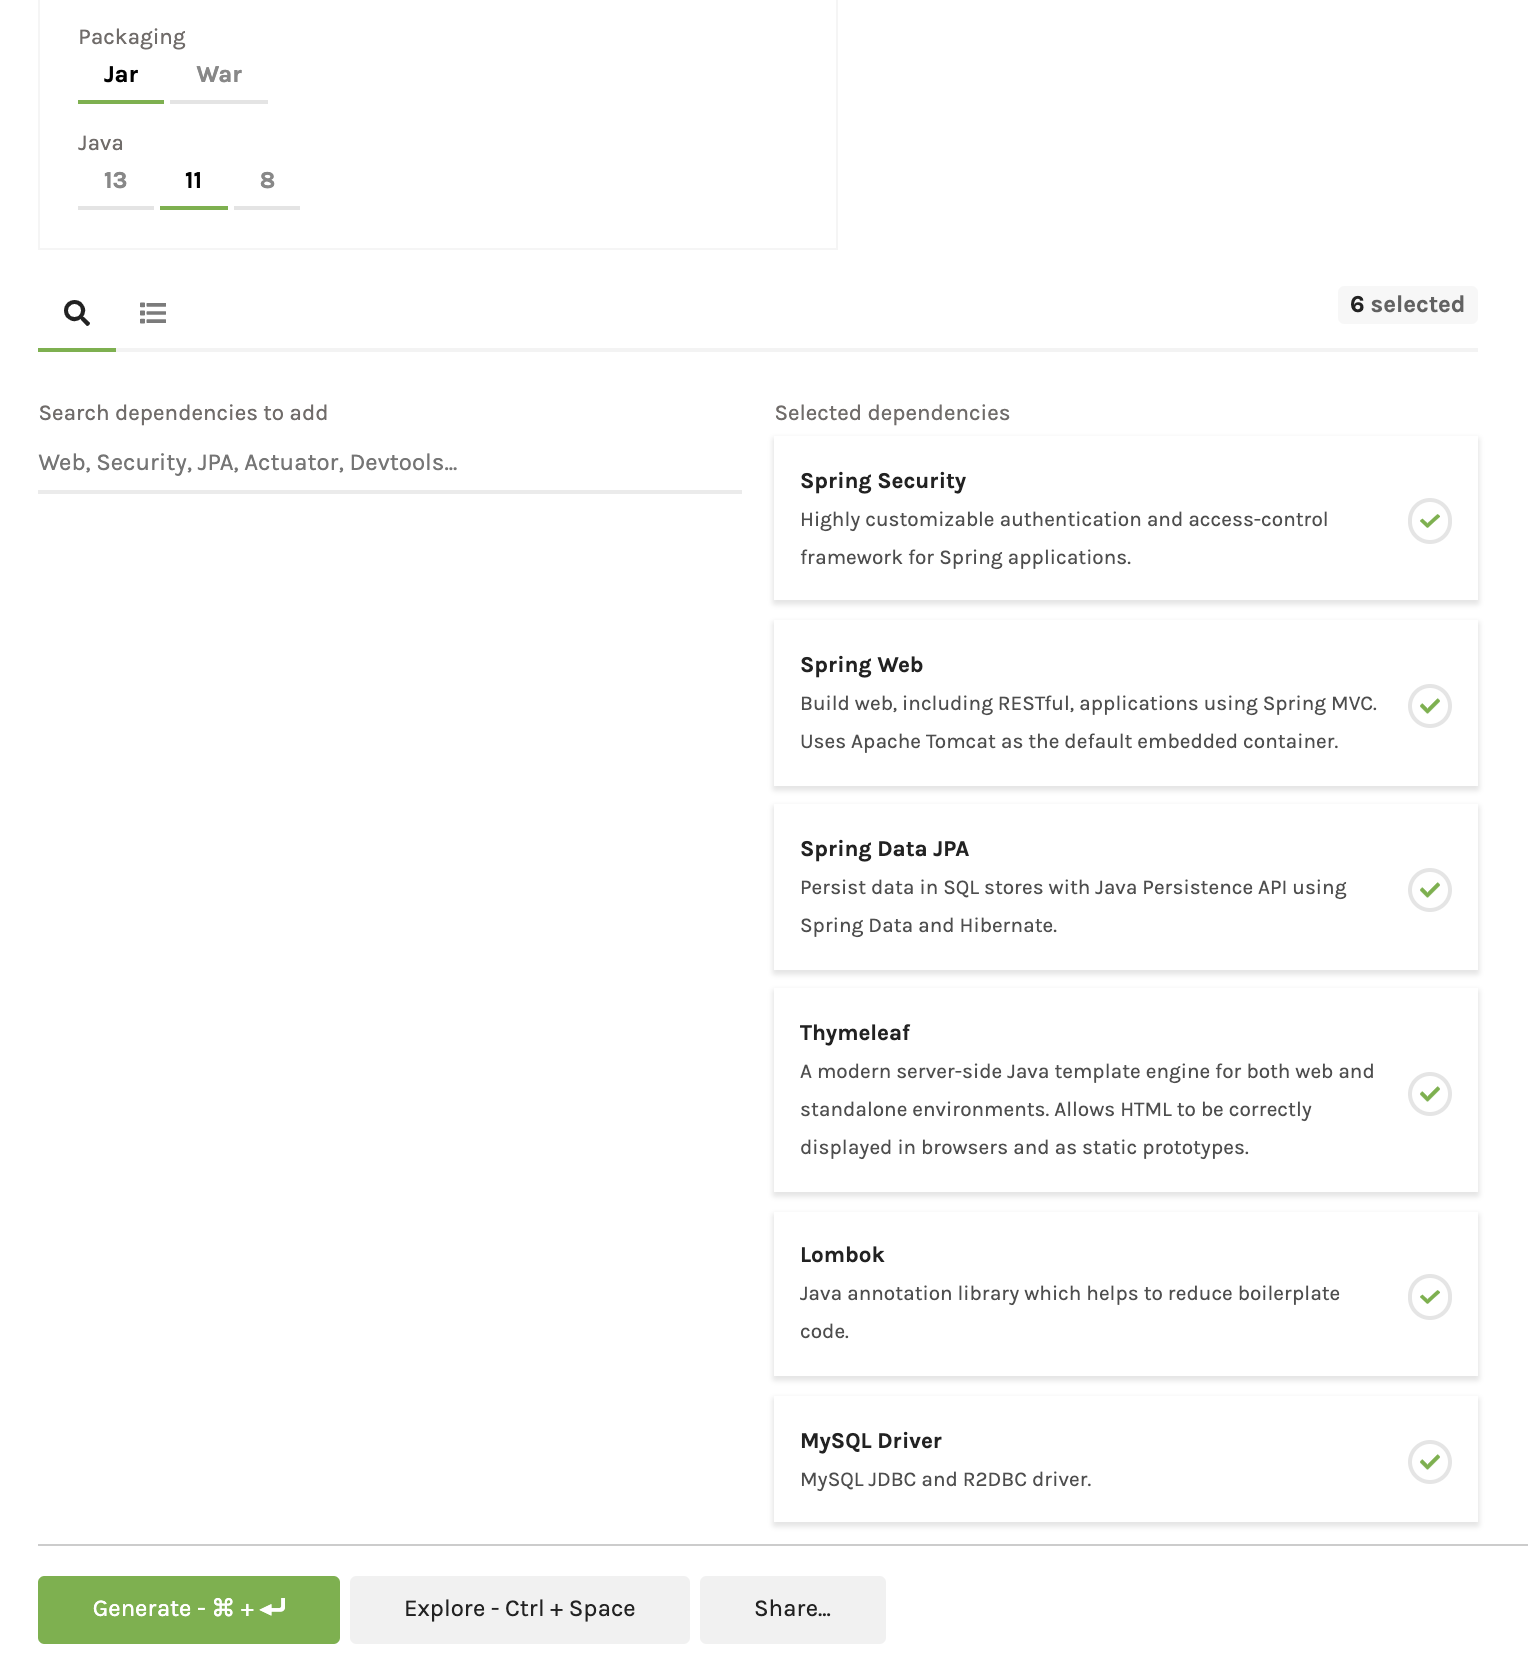


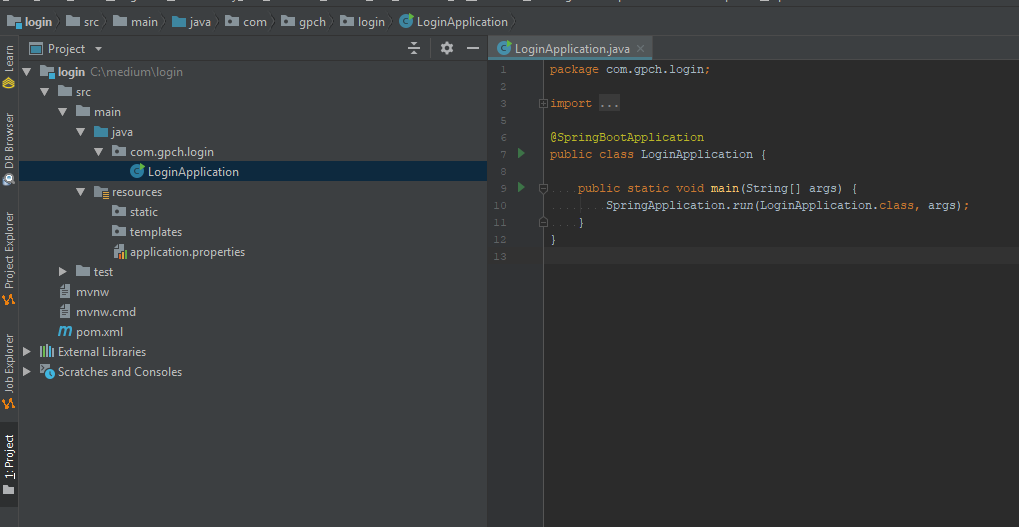
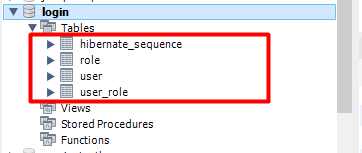
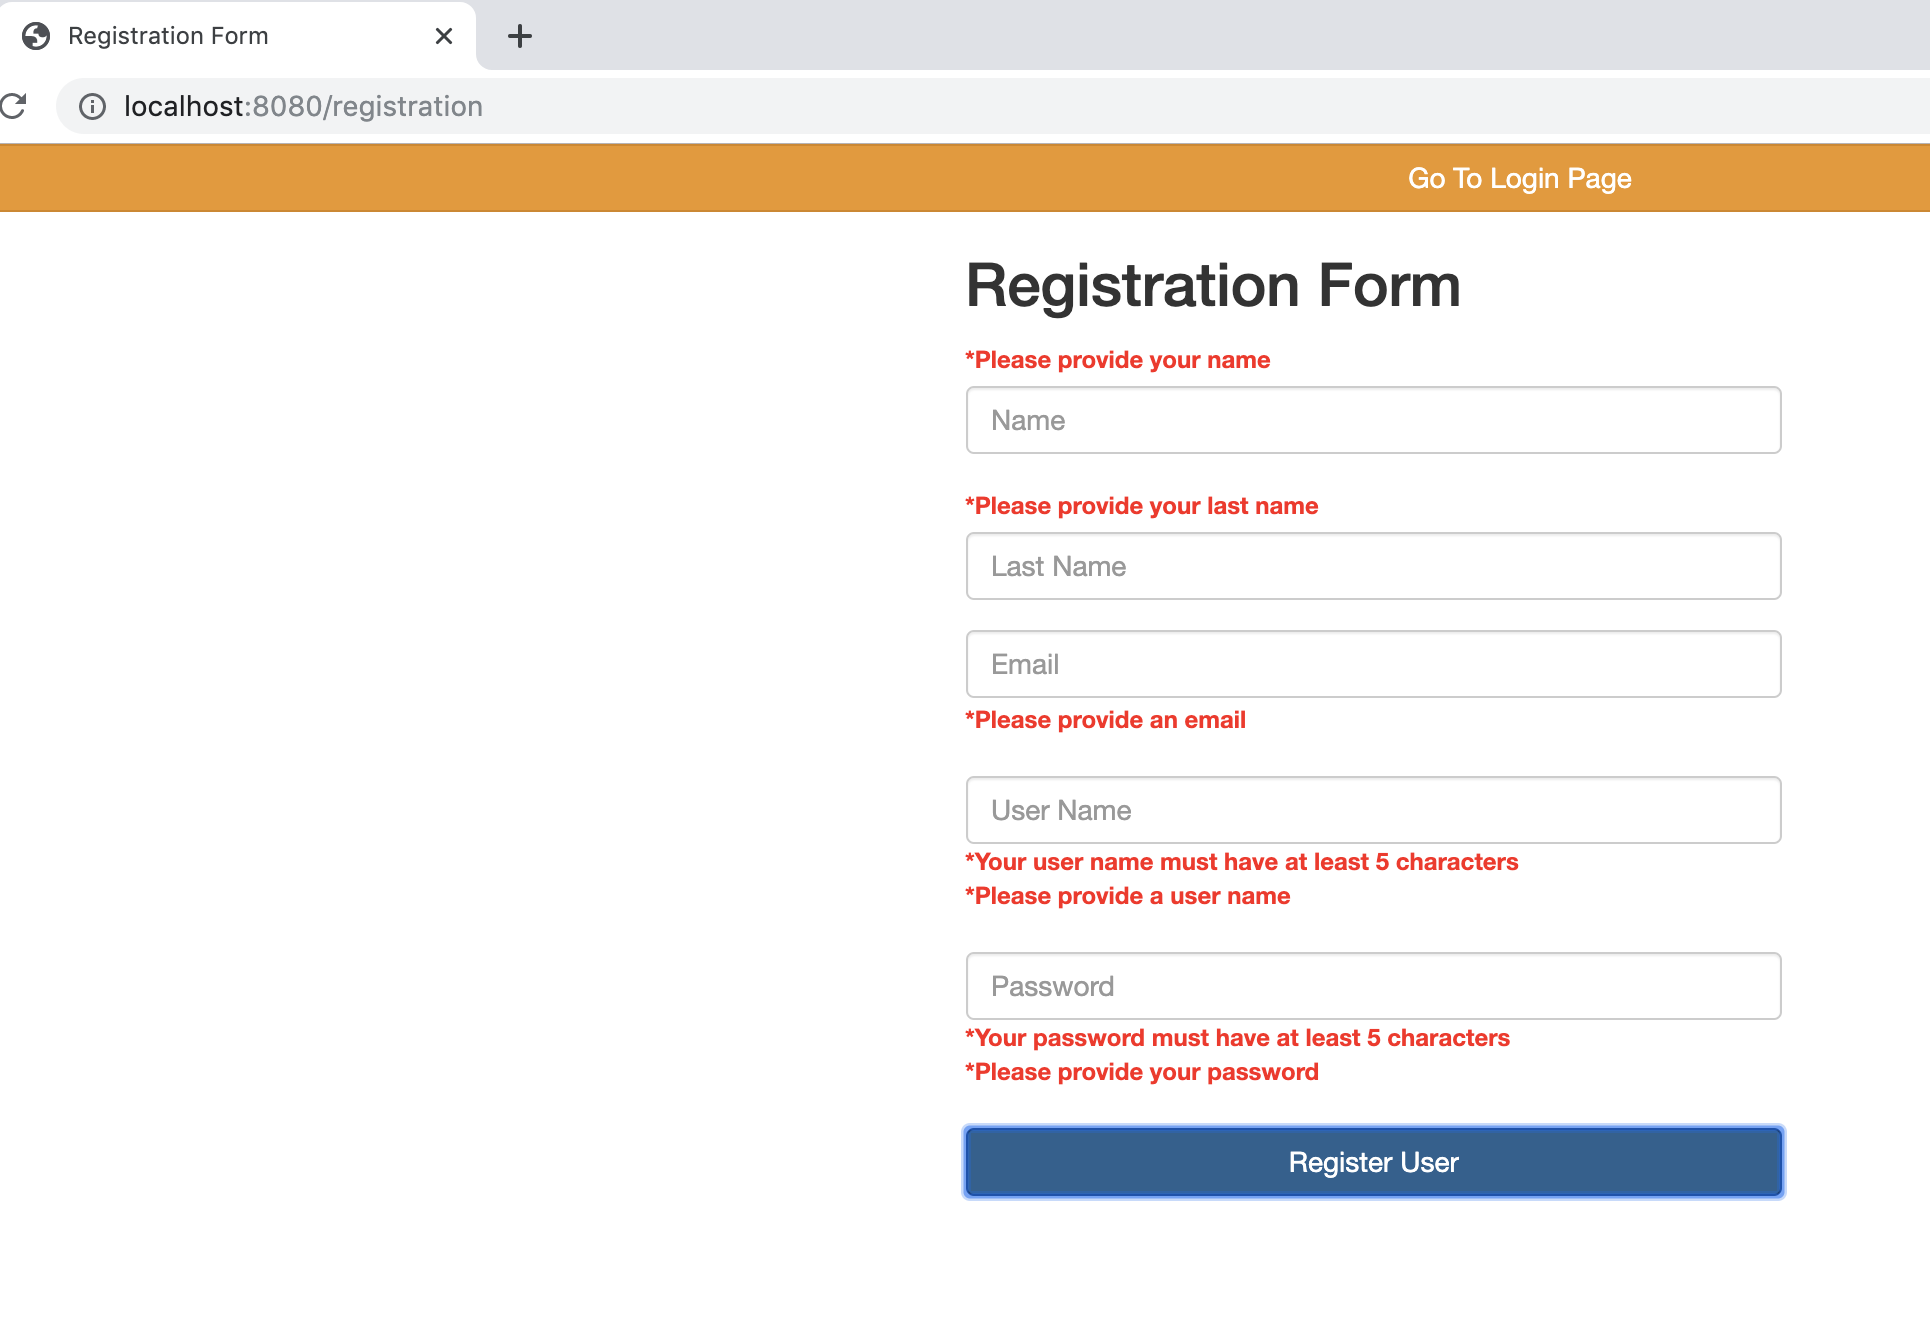


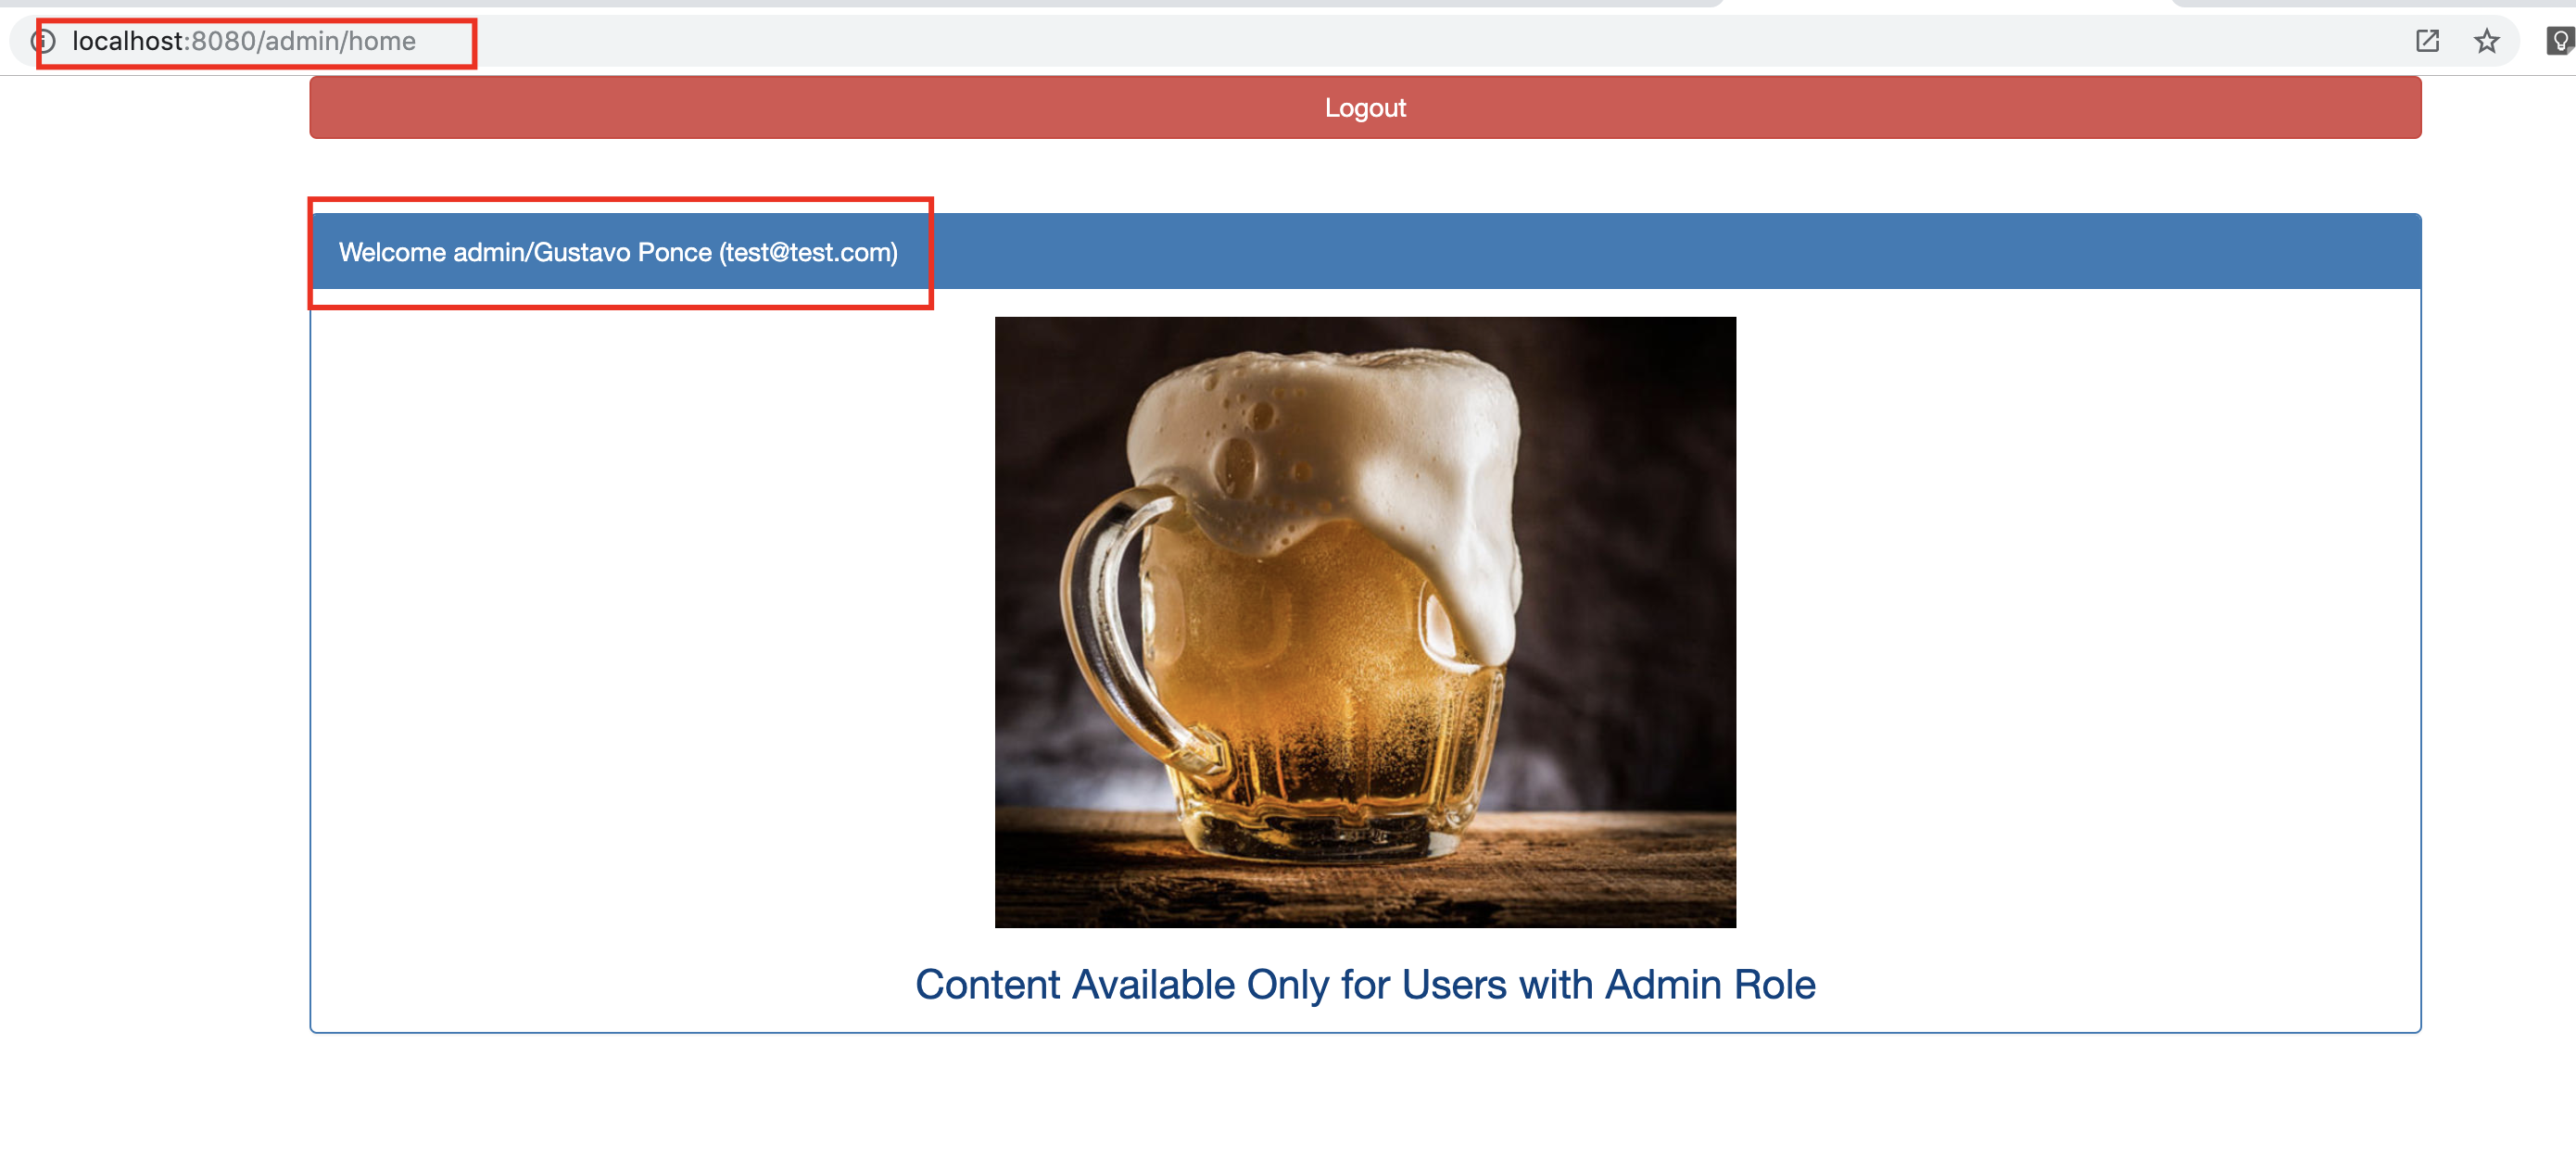


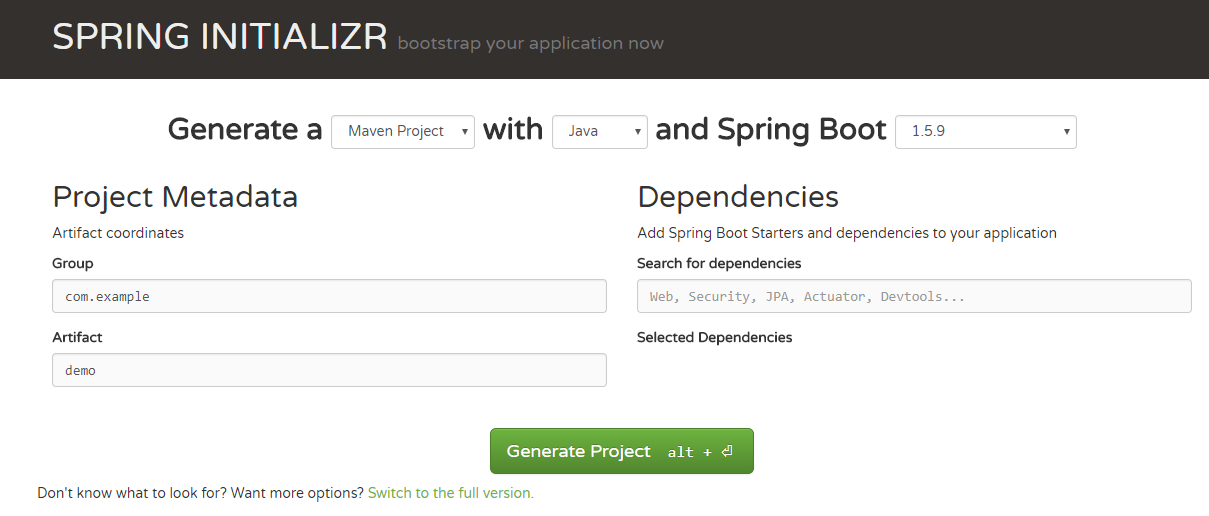
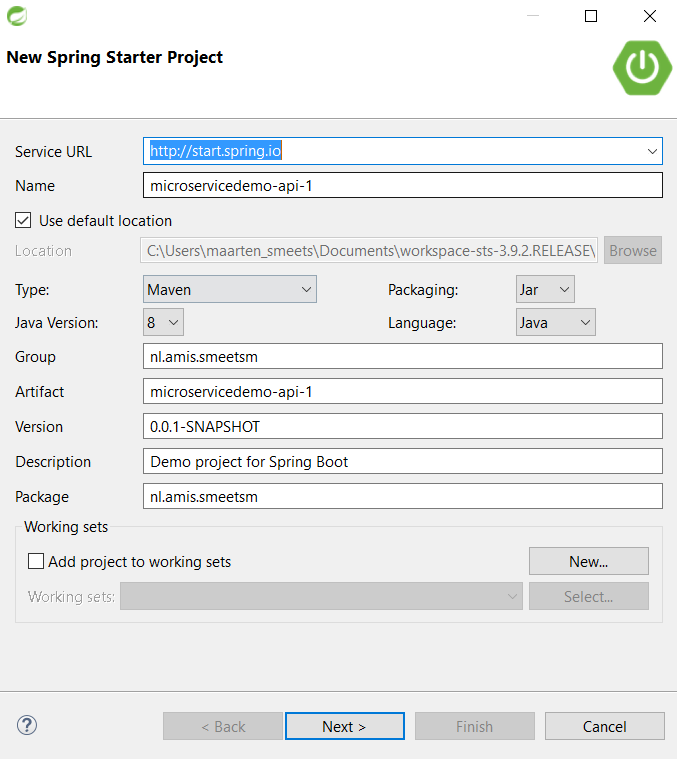


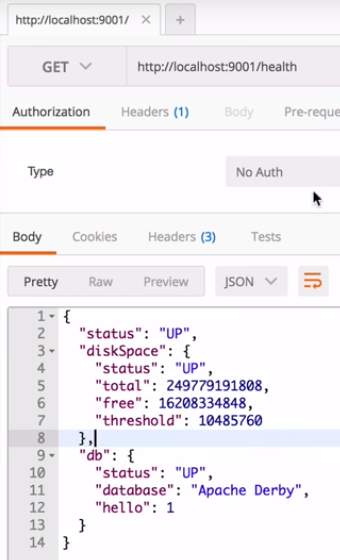